One thing that we eat a lot of in our house is fruit salad. It seems a little weird to me that until the last couple of years I didn't know how to make a simple salad. Of course I knew how to follow a recipe to make one, but I never felt quite satisfied with what I made. It felt like there were more other ingredients than there was fruit and when all was said and done, it was no longer a healthy snack.
I usually make the salad with the different types of fruit. You can use whatever combination you'd prefer. I just find that three is usually best for the flavor and texture I like. Most of the time apples are one of those three just because they are an always available, cheap fruit.
Other than that I try to buy whatever is on sale. I also try to keep some canned fruit and raisins on hand for when I need to add some fruit to a salad and I couldn't find any cheap enough at the store, or I just ran out. Pineapple and mandarins work particularly well.
After you have the fruit chopped up and mixed together you can always eat it like that. I usually need to add some other things to make it truly taste like a salad. One thing I learned is that if I add yogurt, or whatever before I am ready to eat the salad, it gets runny and unappetizing within a day. Leaving the fruit mixed alone in a tightly covered container is the best way to keep it fresh for longer. This also allows you to make whatever kind of salad you are feeling like having by serving. It's highly interchangeable.
Some of the things I like to add in:
The Frugal Matriarch
Monday, May 18, 2020
Friday, April 3, 2020
Beef and Rice Soup
Beef soup is something that makes a pretty frequent appearance on our supper menu. Usually it is made out of leftovers, but sometimes I do use a steak or two (as in the recipe below) slow cooked and added to a soup. As with the previous post Mexican Casserole Recipe there are several different ways to make this dish. I am just giving you a basic idea of what to do, or use and you can build to your own taste and ingredients you have on hand.
What you will need:
Beef, leftover roast, a steak or two.. ect..
Cooked Rice. I use one or two boxes Rice a Roni Wild Rice
Beef bullion cubes
Optional:
Vegetables
2-4 tablespoons of flour
Butter/margarine
Kitchen Bouquet
When I use steak(s) I will usually put them into a slow cooker with about a quarter to half a cup of water and a couple bullion cubes. Sometimes I will use my small cooker and just do the meat in there and use a pot on the stove for the rest of the soup. This time I used the big one and cooked the meat for a few hours on low.
If you're using a slow cooker to cook the entire soup you want to start your rice about two to three hours before you plan to serve the soup, so you can have it done and added to the slow cooker in order to give it time to mingle with the flavors.
Before adding the soup, take the steak out and shred it up.
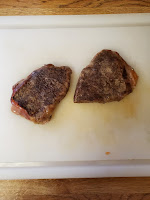
Put the steak back into the pot and add water. This can really depend on how much soup you want to make, and how dense. You can always add more water, but once it's in there it's difficult to get it back out, so it's best to start with the minimal you think you will need.
I like to add a little flour to my soups to make it a little thicker. I do this by taking a couple tablespoons of flour and mixing it with about a half a cup of water, then pouring it into the soup broth before adding any rice or veggies.
I usually add more beef cubes at this point. The general rule is one cube per cup of water you added. I usually melt them in the microwave in a cup or even less of water to make sure they have fully dissolved before adding to any soups, or gravies.
Now add the rice and any vegetables (besides potatoes) you want to add. I used baby carrots that I cooked before adding them to the soup.
I also like to use Kitchen Bouquet, because it adds a lot of flavor and depth to soups and gravies. Just a splash goes a long way.
This is where you're kinda on your own. I make these soups different almost every time, depending on what is available, so the flavors are always different. I taste it at this time and then I know if I should add some butter, more beef cubes, or kitchen Bouquet. I add and then let simmer.
If you're adding potatoes you will want to do that about 30 minutes or so before serving, because they will get mushy really fast. I usually cube some up and add them, but this time I had a can, so I just added that a few minutes before serving. Sometimes I will add leftover mashed potatoes and gravy. It adds a lot of flavor and texture to the soup.
And, that is pretty much it! This is a very cheap, customizable recipe that can work on so many levels. I hope it left you with some good ideas!
What you will need:
Beef, leftover roast, a steak or two.. ect..
Cooked Rice. I use one or two boxes Rice a Roni Wild Rice
Beef bullion cubes
Optional:
Vegetables
2-4 tablespoons of flour
Butter/margarine
Kitchen Bouquet
When I use steak(s) I will usually put them into a slow cooker with about a quarter to half a cup of water and a couple bullion cubes. Sometimes I will use my small cooker and just do the meat in there and use a pot on the stove for the rest of the soup. This time I used the big one and cooked the meat for a few hours on low.
If you're using a slow cooker to cook the entire soup you want to start your rice about two to three hours before you plan to serve the soup, so you can have it done and added to the slow cooker in order to give it time to mingle with the flavors.
Before adding the soup, take the steak out and shred it up.
Put the steak back into the pot and add water. This can really depend on how much soup you want to make, and how dense. You can always add more water, but once it's in there it's difficult to get it back out, so it's best to start with the minimal you think you will need.
I like to add a little flour to my soups to make it a little thicker. I do this by taking a couple tablespoons of flour and mixing it with about a half a cup of water, then pouring it into the soup broth before adding any rice or veggies.
I usually add more beef cubes at this point. The general rule is one cube per cup of water you added. I usually melt them in the microwave in a cup or even less of water to make sure they have fully dissolved before adding to any soups, or gravies.
Now add the rice and any vegetables (besides potatoes) you want to add. I used baby carrots that I cooked before adding them to the soup.
I also like to use Kitchen Bouquet, because it adds a lot of flavor and depth to soups and gravies. Just a splash goes a long way.
This is where you're kinda on your own. I make these soups different almost every time, depending on what is available, so the flavors are always different. I taste it at this time and then I know if I should add some butter, more beef cubes, or kitchen Bouquet. I add and then let simmer.
If you're adding potatoes you will want to do that about 30 minutes or so before serving, because they will get mushy really fast. I usually cube some up and add them, but this time I had a can, so I just added that a few minutes before serving. Sometimes I will add leftover mashed potatoes and gravy. It adds a lot of flavor and texture to the soup.
And, that is pretty much it! This is a very cheap, customizable recipe that can work on so many levels. I hope it left you with some good ideas!
Sunday, March 29, 2020
Mexican Casserole Recipe
One regular meal we have at my house is Mexican Casserole. It is a vague name, because "Mexican Casserole" can mean a lot of different things, depending on what ingredients I have on hand.
It usually consists of chicken or beef with at least one type of bean that I cover/layer with cheese and put into the oven to let the flavors simmer together. The following recipe has about fifty different variations, but I'll try to give a basic template of how to make this dish.
First thing I do is cook the meat. This time I used chicken, so I boiled one and a half chicken breast with 3 cubes of chicken bouillon. You can cook it different ways, but I like the flavor and consistency of boiled chicken breast in broth for this type of recipe.
After the chicken is done I shred it up with two forks. Then I empty the broth that it was cooked in until there is about a quarter of a cup or less left in the pan.
I add the chicken back to the broth and add the seasoning. I used fajita seasoning this time, because that's what I had. Sometimes I'll add jalapenos, but this time I used half a can of green chilies. I put in a bit of minced garlic, but sadly no onion, because the rest of my family doesn't like them.
I simmer that for a few minutes while I put whatever beans I am gonna use in an oven safe casserole dish. This time I used homemade refried beans and black beans that I had from the freezer. I layered the refried beans on the bottom, then a little cheese and then I added the chicken, and then about a half cup of black beans. I put some cheese on top of that and bake it covered at 350 degrees for around 30 minutes. Serve with tortilla chips, corn chips, or tortillas.
Monday, January 9, 2017
Oven Roasted Drumsticks
Since I mentioned that drumsticks, and thighs were on sale nearby on my page I thought that it might be a good time to also make a quick blog entry about my favorite way to make them. This method is not only tasty, but it's quick, and easy, too!
All you need is the chicken, whatever your preferred seasoning is, (I use garlic salt, usually) and a broiling pan. If you don't have one you can also use a cookie sheet covered in foil with a cooling rack on top. like this:
First: preheat oven to 450 degrees, and spray your pan with cooking spray.
All you need is the chicken, whatever your preferred seasoning is, (I use garlic salt, usually) and a broiling pan. If you don't have one you can also use a cookie sheet covered in foil with a cooling rack on top. like this:
First: preheat oven to 450 degrees, and spray your pan with cooking spray.
Monday, September 21, 2015
Kitchen Space Saving Tip- How to organize storage container lids
One of the most frustrating spaces in a kitchen for me is the storage container cabinet. If the containers aren't put away just right things won't all fit, and you end up with a containerlanche when you open the cabinet door.
The lids are especially hard to organize, and keep stacked without falling, or taking up a lot of space. One of the ways that I have found to remedy this is by organizing them into storage bags by either shape, type, or size.
For more tips, and ideas be sure to follow The Frugal Matriarch on Facebook HERE
The lids are especially hard to organize, and keep stacked without falling, or taking up a lot of space. One of the ways that I have found to remedy this is by organizing them into storage bags by either shape, type, or size.
Like this:
This is all of my round container lids |
Here we have all of my square, and rectangle lids |
See how they all stack nicely without falling? |
For more tips, and ideas be sure to follow The Frugal Matriarch on Facebook HERE
Wednesday, May 20, 2015
Don't Throw Away Those Crumbs! Use Them for Dinner Instead!
We all have those little bits of chips, and crumbs that is left at the bottom of bags, and boxes that we usually throw away without thinking twice about it. What if I told you that you could those crumbs in everyday recipes?
Instead of tossing the crumbs out I put them into sandwich bags that I store inside a freezer bag inside of the freezer. Sometimes, I will write with Sharpie the date, and/or contents.
The crumbs can be from chips, crackers, or even broken up taco shells. Sometimes, it's not even just crumbs that I save. If I have some crackers, or chips going stale I might go ahead, and add them to the freezer bag, too. That way I am not tossing them out, and wasting food.
So what can you do with these crumbs?
Instead of tossing the crumbs out I put them into sandwich bags that I store inside a freezer bag inside of the freezer. Sometimes, I will write with Sharpie the date, and/or contents.
So what can you do with these crumbs?
Friday, May 15, 2015
No Bake Chocolate Chip Cheesecake
I usually make this for holidays, or special occasions. It is so easy, and quick to make, yet absolutely delicious.
What you'll need:
* 8 oz. block cream cheese (softened)
* graham cracker/oreo pie crust
* whipped topping
* 1 box instant chocolate pudding
* 1 can sweetened condensed milk
* chocolate chips (about 1/2 cup worth)
Directions:
Mix together cream cheese, condensed milk, pudding mix, and a few spoonfuls of whipped topping. Keep mixing, and adding whipped topping until the filling looks to be about the right texture. It will take at least 2/3 cup. When the filling is mixed thoroughly, and is completely smooth spoon into crust. Sprinkle chocolate chips on top, and chill. That's it!
* Note: I always soften my cream cheese by putting an unopened package into a glass of warm water for a couple minutes.
Subscribe to:
Posts (Atom)